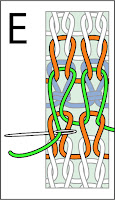
This is a handy diagram-only reference to the process of TRANSFORMATION. It goes with the TECHknitting blog series on IMPROVED CELTIC KNOTS. The first of the series explains transformation in greater detail.
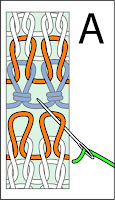
STEP 1 |
--Stitch A (top stitch of outer dominant right column) is placed on crochet hook, untwisted
--Stitch B (top stitch of outer non-dominant left column) on double pointed needle (dpn). It is colorized purple in the closeup insert --On bobby-pin holders, the inner columns wait, staying out of the way. |
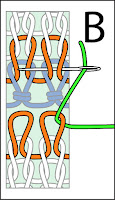
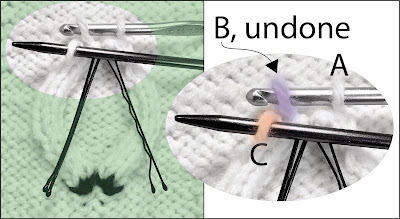
STEP 2
 |
--LEFT: Stitch B, the stitch at the top of the left non-dominant arm is being undone (pulled out of the top of the stitch
below, C) by picking at it with the dpn in the direction shown by the transparent purple arrow. This process may be referred to as "STRANDIFYING"
--RIGHT: By picking the loop out of the top of stitch C, what was stitch B is now a mere strand over the dpn, while S titch C is now open on top. |
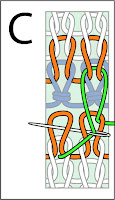
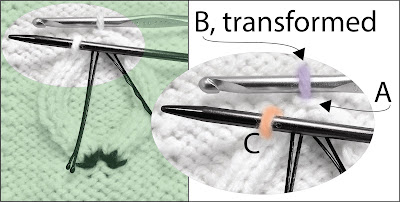
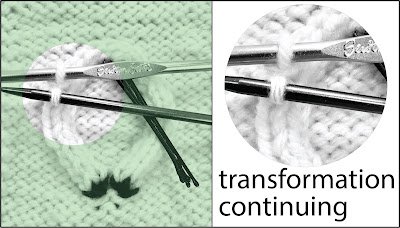
 |
| Stitch B has been undone into a strand and this strand has been transferred to lay over the barrel of the crochet hook which has been holding stitch A. Meanwhile, the dpn has been inserted into stitch C, colorized orange. In this way, stitch C has become the new top stitch of the non-dominant column. Click to enlarge. |
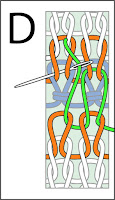
STEP 4
 |
| --After being pulled through stitch A, B is no longer a strand, but has been transformed, taking A's place as the lead stitch of the dominant column. --Stitch C is next in line and will be transformed the same way: turned into a strand with the dpn, placed on the hook, and then pulled through stitch B. Click to enlarge. |
STEP 5
 |
| Several stitches in the outer left stitch-column have now been transformed using the crochet hook and the dpn. Click to enlarge |
STEP 6
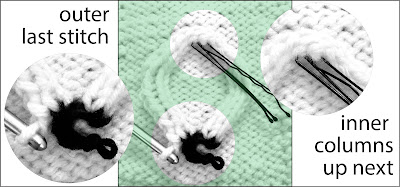 |
--The last outer stitch in the non-dominant column is worked by pulling it out of the scrap-yarn stitch holder at the bottom of the column and transforming it as before: first into a strand, and then into a stitch in the dominant column. The scrap-yarn loop which anchored that column now flops empty. It would be best to pull it to the back, out of the way. The bottom of the column now on a crochet hook is to be put onto a bobby pin. --The inner columns, waiting on their bobby pins, are coming up next |
STEP 7
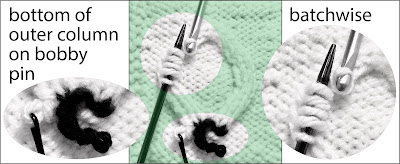 |
| Outer column all transformed, its bottom stitch has been put on a bobby pin holder. Now, the inner column is being (optionally) transformed batchwise, meaning,releasing a batch of stitches at a time, catching them over the dpn and then hooking them all up before releasing another batch of stitches. Click to enlarge |
STEP 8
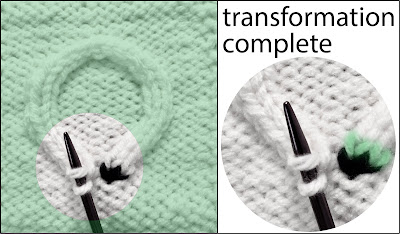 |
| Transformation of both columns is complete--see how nice the loop-top looks on the left general view? Now it's time to make the bottom look equally nice by grafting the heads of the stitches on the dpn to the tails of the green-colorized stitches on the (dark-colored) scrap yarn placeholder, as shown more clearly on the left closeup insert . Click to enlarge |
Step 9 is dupli-grafting the ring shut. That step has its own diagram-only version.