Transforming an "under," a resource for Infinity Loop Celtic knots and motifs

This is an extract from the TECHknitting post about DOUBLE BOWEN CELTIC KNOTS. It shows how to transform a bottom cable arm running under a top cable arm, when transforming a Celtic Knot via INFINITY LOOPS, working the LONG WAY (no shortcuts). For further details, go to the original post

Transforming an "under"

If you choose to work a transformation the long way (no shortcuts)  there will come a time when you have to transform around the cross on a cable arm. 

These crosses come in two flavors: "overs" and "unders." Transforming "overs" is simply no different than regular transformation. The stitches doing the cross-over are no different than any other stitches in the column, and are transformed the same way, it being immaterial whether another cable arm is passing under those particular stitches. 

This is not true of "unders," which are a bit more complicated. Here is how to transform an "under" in 5 illustrated steps.

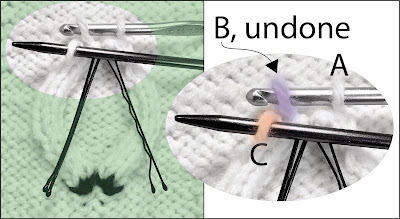
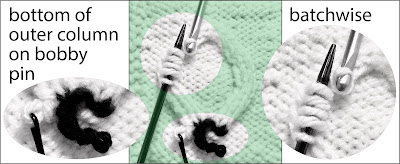
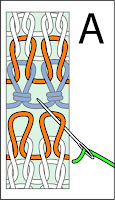
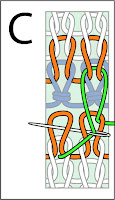
1. Transform the outer column in the usual way, all the way down to the cable cross. The bottom loop of the outer column being transformed is colored blue, the stitch below it, red. The red stitch is the one which actually crosses behind the cable. I put it on a coiless safety pin and pulled it forward, just so you could see it peeking out from under the upper cable arm. In the ordinary course of things, the red stitch would NOT be visible. It would simply be waiting on the back of the fabric; not pulled forward, not put on a safety pin. 


2Not illustrated. The head of the blue stitch is pulled to the back using the hook. Then, the fabric is flipped. Next, the red stitch is strandified, then re-formed into a stitch by being pulled through the blue loop. (Of course, in this particular case, the red stitch was taken off its safety pin to strandify it, but usually, the red stitch would just be sitting there waiting on the back, with no safety pin through it)

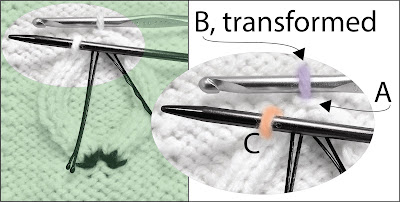
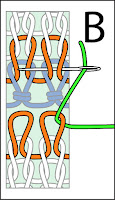
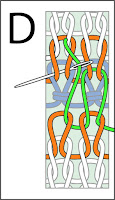
3. This is a view of the fabric back after step 2. Due to the red stitch having been strandified and re-formed into a stitch, the red strand has been pulled through the blue and is now the lead stitch in its column. The red stitch is now to be put on a coil-less safety pin or a bobby pin as a holder in real life. In other words, in this step, the pin isn't just for demonstration purposes unlike in step 1. In this step, you actually DO want to put the red stitch on a safety pin or other holder. As you'll see in the step 5, having the red stitch on a holder will help maneuver the stitch from the back to the front as part of the "undercrossing" being transformed. The green hole shown at picture 4 is not visible in this view, because the red stitch is flopped over it. 


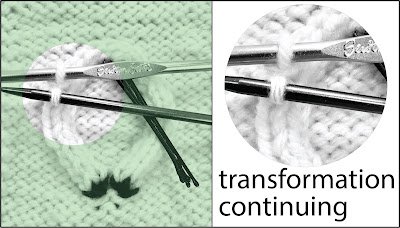
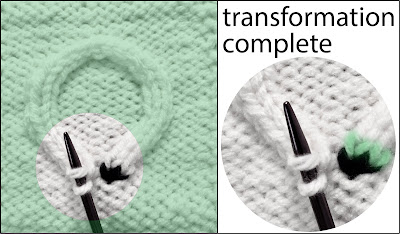
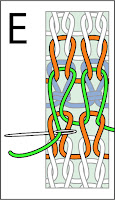
4. This is a view of the fabric front. The stitch which was below the red stitch is colored purple. It is the first stitch past the cable crossing in the same column, the first stitch of its loop which sees daylight. It was waiting on the fabric front, and has now been put on a bobby pin for safekeeping. In this photo, I have stretched the fabric so you can now see the hole (green arrow). This hole is above the purple stitch, and was hidden by the red stitch in illustration 3.  Therefore, above the hole, at the back of the fabric where you cannot see it in this picture, the red stitch waits on its holder, as shown in picture 3.


5. Using the pin as a handle, the red stitch has been pulled through the hole marked with the green arrow. This fills the hole so it no longer exists. 


The next step would be to slip the red stitch from its safety pin holder back onto the crochet or latch hook, then remove the purple stitch from the bobby pin, then strandify and transform the purple stitch. After this, the remainder of the column would be transformed down to the bottom of the cable arm. The inner column will be transformed the same way when its turn comes to do the "undercross." 

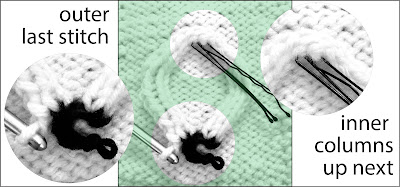
Here you see a comparison of the cable cross before and after transformation of both the outer and inner columns. The gray V's show that transformation reverses the stitch direction (which is what eliminates the green- and red-dot discontinuities). The blue and purple stitches remain in the same position, just turned on their heads. The red stitches (which have also been stood on their heads) are not visible: they are on the fabric back. The green hole no longer exists, having been plugged when the red stitches (invisible on the fabric back) re-connected with the purple during transformation. 


Transforming an "under" resembles correcting a miscrossed cable by letting out a ladder and latching it up again, but without turning the "under" into an over, and with the added feature of strandifying and turning the stitches upside-down as they are transformed.  

Transformation, diagram-only version

 This is a handy diagram-only reference to the process of TRANSFORMATION. It goes with the TECHknitting blog series on IMPROVED CELTIC KNOTS. The first of the series explains transformation in greater detail. 

STEP 1


--Stitch A (top stitch of outer dominant right column) is placed on crochet hook, untwisted
--Stitch B (top stitch of outer non-dominant left column) on double pointed needle (dpn). It is colorized purple in the closeup insert
--On bobby-pin holders, the inner columns wait, staying out of the way.


STEP 2


--LEFT: Stitch B, the stitch at the top of the left non-dominant arm is being undone (pulled out of the top of the stitch 
below, C) by picking at it with the dpn in the direction shown by the transparent purple arrow.  This process may be referred to as "STRANDIFYING"
--RIGHT: By picking the loop out of the top of stitch C, what was stitch B is now a mere strand over the dpn, while S
titch C is now open on top.


STEP 3
Stitch B has been undone into a strand and this strand has been transferred to lay over the barrel of the crochet hook which has been holding stitch A.  Meanwhile, the dpn has been inserted into stitch C, colorized orange. In this way, stitch C has become the new top stitch of the non-dominant column. Click to enlarge.

STEP 4

--After being pulled through stitch A, B is no longer a strand, but has been transformed, taking A's place as the lead stitch of the dominant column.  
--Stitch C is next in line and will be transformed the same way: turned into a strand with the dpn, placed on the hook, and then pulled through stitch B. Click to enlarge.


STEP 5

Several stitches in the outer left stitch-column have now been transformed using the crochet hook and the dpn. Click to enlarge


STEP 6

--The last outer stitch in the non-dominant column is worked by pulling it out of the scrap-yarn stitch holder at the bottom of the column and transforming it as before: first into a strand, and then into a stitch in the dominant column.  The scrap-yarn loop which anchored that column now flops empty. It would be best to pull it to the back, out of the way. The bottom of the column now on a crochet hook is to be put onto a bobby pin.
--The inner columns, waiting on their bobby pins, are coming up next


STEP 7

Outer column all transformed, its bottom stitch has been put on a bobby pin holder. Now, the inner column is being (optionally) transformed batchwise, meaning,releasing a batch of stitches at a time, catching them over the dpn and then hooking them all up before releasing another batch of stitches.  Click to enlarge


STEP 8

Transformation of both columns is complete--see how nice the loop-top looks on the left general view?  Now it's time to make the bottom look equally nice by grafting the heads of the stitches on the dpn to the tails of the green-colorized stitches on the (dark-colored) scrap yarn placeholder, as shown more clearly on the left closeup insert . Click to enlarge


Step 9 is dupli-grafting the ring shut. That step has its own diagram-only version

Dupli-grafting, diagram version

 This is a diagram-only extract from the TECHknitting post on Infinity loop intro. The process is explained in greater detail there. 


A: Thread a blunt-nosed large eyed sewing needle with a 6-8 inches of yarn. Take the two open loops off the dpn and arrange them so they lay flat in your fingers, and not twisted at their bases. Start by inserting the threaded needle into the BACK of the right open loop. This is the bottom loop of the outer column you transformed.
 

B: Next, insert the needle from right to left BEHIND both tail-strands. The stitch you're operating on is the base of the outer column of the dominant cable arm. Use the path of the scrap yarn as your guide for where to put your needle in and where to take it out. If you have ever used the chimney method of grafting shut a sock toe, it's the same trick of grafting along a contrasting yarn guide. This is the duplicate stitch part of the operation, where your yarn duplicates the path of a knitted guide stitch.


C: now insert the needle into the FRONT of the lower right open loop and then into the BACK of the lower left open loop.
 

Step D is the same as step B: following the guide provided by the contrasting yarn, insert the needle from right to left BEHIND both stands of the tail yarn of the second stitch, as shown.


Step E: End by drawing the needle through the FRONT of the left lower stitch.


For another post which also features Dupli-grafting, featuring a different set of diagrams, see TECHknitting post: Cables crossed wrong, anchored I-cord disguises the miscross


Picasso portrait (pinpoint cite)


Portrait of Dora Maar
by Picasso
Placeholder


placeholder


placeholer